Monday 26 May 2014

Configuring Microsoft Dynamics NAV Web Client by Modifying the Web.Config File


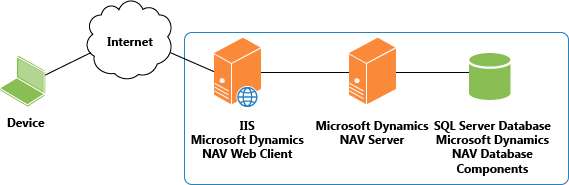
To install Microsoft Dynamics NAV Web client, you run Microsoft Dynamics NAV 2013 Setup. Setup installs a website for Microsoft Dynamics NAV Web client on an Internet Information Services server and configures the connection from Microsoft Dynamics NAV Web client to Microsoft Dynamics NAV Server.

The connection information is saved in the web.config file of the Microsoft Dynamics NAV Web client site. After installation, you can change the configuration by modifying the web.config file.

Note
If you have set up multiple Microsoft Dynamics NAV Web client applications on the same website, then each application has its own web.config file that you can modify. For more information, see How to: Set Up Multiple Microsoft Dynamics NAV Web Client Applications on a Website.

About the web.config File

The web.config file is an .xml file that you can edit with a text editor, such as Notepad. By default, the web.config file is located in the c:\Program Files\Microsoft Dynamics NAV\70\Web Client folder.
If you have set up multiple Microsoft Dynamics NAV Web client applications on the same website, then each application has its own web.config file that you can modify. For more information, see How to: Set Up Multiple Microsoft Dynamics NAV Web Client Applications on a Website.

Note
After you modify the web.config file, if you have Microsoft Dynamics NAV Web client open in the Internet browser, the changes will not take effect until you close the browser session, and then reopen Microsoft Dynamics NAV Web client.

Microsoft Dynamics NAV Settings in the web.config File

The Microsoft Dynamics NAV Web client settings are included in the <DynamicsNAVSettings> element in the web.config file. The following table describes the settings that are available in the <DynamicsNAVSettings> element.

Important


All values must be enclosed in Quotation marks.
Setting
Description
AllowNtlm Specifies whether NT LAN Manager (NTLM) fallback is permitted for authentication.
To require Kerberos authentication, set this value to false.
Values: true, false
Default value: true
ClientServicesChunkSize Sets the maximum size, in kilobytes, of a data chunk that is transmitted between Microsoft Dynamics NAV Web client and Microsoft Dynamics NAV Server. Data that is transmitted between Microsoft Dynamics NAV Web client and Microsoft Dynamics NAV Server is broken down into smaller units called chunks, and then reassembled when it reaches its destination.
Values: From 4 to 80.
Default: 28.
Company Sets the company in Microsoft Dynamics NAV to connect to. If you do not define a company, then the company that was last opened by the user is used.
Values: A company defined in the Microsoft Dynamics NAV solution.
For more information about companies, see How to: Create Companies.
Default value: none
ClientServicesCompressionThreshold Sets the threshold in memory consumption at which Microsoft Dynamics NAV Web client starts compressing data sets. This limits amount of consumed memory. The value is in kilobytes.
Default: 64
TimeZone Sets the time zone for Microsoft Dynamics NAV Web client. The time zone will apply to date and time data that a user views or enters in the Microsoft Dynamics NAV Web client.
Values: A time zone that is included in the registry of the computer that is running Microsoft Dynamics NAV Web client. You find the time zones in the registry under HKEY_LOCAL_MACHINE\SOFTWARE\Microsoft\Windows NT\CurrentVersion\Time Zones. The value must match a time zone that is listed in the registry. For example, you can set the value to "Pacific Standard Time" or "Central Europe Standard Time".
Default value: UTC
Language Sets the language version of the Microsoft Dynamics NAV Web client. For more information about languages, see Multilanguage Development and Managing Language, Regional Settings, and Time Zone in the Microsoft Dynamics NAV Web Client.
Values: A valid culture name for a language that is available for the Microsoft Dynamics NAV solution. The culture name has the format: nn-NN. nn is a lowercase two-letter code for the language and NN is an uppercase two-letter code for the country or region. For example, en-US is for English (United States) and en-GB is for English (United Kingdom), and da-DK is for Danish (Denmark). There are some languages that use a three-letter language code or a suffix to the region code. The culture name must follow the RFC 1766 standard. For a list of the most common culture names, see CultureInfo Class.
Default value: The culture name of the language version of Microsoft Dynamics NAV that was installed.
Description: http://partnersource.ru/nav2013_devitpro.en/local/important.gifImportant
For the Spanish version of Microsoft Dynamics NAV, you must set the value to es-ES_tradnl.
RegionFormat Specifies the culture name that is used to format dates, times, numbers, and currency in the Microsoft Dynamics NAV Web client.
Values: A valid language culture name that has the format: nn-NN. nn is a lowercase two-letter code for the language and NN is an uppercase two-letter code for the country or region. For example, en-US is for English (United States) and en-GB is for English (United Kingdom), and da-DK is for Danish (Denmark). There are some languages that use a three-letter language code or a suffix to the region code. The culture name must follow the RFC 1766 standard. For a list of the most common culture names, see CultureInfo Class.
Default value: The culture name for the language version of Microsoft Dynamics NAV that was installed.
ClientServicesProtectionLevel Specifies the security services used to protect the data stream between the Microsoft Dynamics NAV Web client and Microsoft Dynamics NAV Server. This value must match the value that is specified in the Microsoft Dynamics NAV Server configuration file. For more information, see Configuring Microsoft Dynamics NAV Server.
Values: EncryptAndSign, Sign, None
Default value: EncryptAndSign
Server Specifies the name of the computer that is running the Microsoft Dynamics NAV Server.
Default value: localhost
ServerInstance Specifies the name of the Microsoft Dynamics NAV Server instance that the Microsoft Dynamics NAV Web client connects to.
For more information, see Managing Microsoft Dynamics NAV Server Instances.
Default value: DynamicsNAV70
ClientServicesCredentialType Specifies the authorization mechanism that is used to authenticate users who try to connect to the Microsoft Dynamics NAV Web client. For more information, see How to: Configure User Authentication for the Microsoft Dynamics NAV Web Client and Users and Credential Types.
The credential type must match the credential type configured for the Microsoft Dynamics NAV Server instance that the Microsoft Dynamics NAV Web client connects to. For information about how to set up the credential type on Microsoft Dynamics NAV Server, see Configuring Microsoft Dynamics NAV Server.
Values: Windows, UserName, NavUserPassword, AccessControlService
Default value: Windows
ClientServicesPort Specifies the TCP port for the Microsoft Dynamics NAV Server. This is part of the Microsoft Dynamics NAV Server’s URL.
Values: 1-65535
Default value: 7046
ServicePrincipalNameRequired If this parameter is set to true, then the Microsoft Dynamics NAV Web client can only connect to a Microsoft Dynamics NAV Server instance that has been associated with a service principal name (SPN).
If this parameter is set to false, then the Microsoft Dynamics NAV Web client attempts to connect to the configured Microsoft Dynamics NAV Server service, regardless of whether that service is associated with an SPN.
For more information about SPNs, see How to: Set Up Delegation on the Microsoft Dynamics NAV Portal Framework.
Default: false
SessionTimeout Specifies the maximum time that a connection between the Microsoft Dynamics NAV Web client and the Microsoft Dynamics NAV Server can remain idle before the session is stopped.
In the Microsoft Dynamics NAV Web client, this setting determines how long an open Microsoft Dynamics NAV page or report can remain inactive before it closes. For example, when the SessionTimeout is set to 20 minutes, if a user does not take any action on a page within 20 minutes, then the page closes and it is replaced with the following message: The page has expired and the content cannot be displayed.
The time span has the format [dd.]hh:mm:ss[.ff]:
  • dd is the number of days
  • hh is the number of hours
  • mm is the number of minutes
  • ss is the number of seconds
  • ff is fractions of a second
Default value: 00:20:00
HelpURL Specifies the URL that is targeted by the Microsoft Dynamics NAV Help action in Microsoft Dynamics NAV Web client. By default, the URL targets the Microsoft Dynamics NAV 2013 Help in the MSDN library at www.msdn.com. This is a public website, so to view the Help, users must have permission to access the Internet or the default Help URL as a minimum.
Values: A valid URL
Default value: http://go.microsoft.com/fwlink/?LinkID=233743
ShowReportViewerExportOptions Specifies whether to show the options for saving a report as a Microsoft Excel, Microsoft Word, or Acrobat (PDF) file in the Print Preview for Microsoft Dynamics NAV reports in the Microsoft Dynamics NAV Web client.
If this parameter is set to true, then the save as Excel, Word, and PDF options appear in the Print Preview.
Default: false
Description: http://partnersource.ru/nav2013_devitpro.en/local/note.gifNote
To display reports, Microsoft Report Viewer must be configured in the web.config file of the Microsoft Dynamics NAV Web client application. Microsoft Report Viewer is configured by default. For more information, see How to: Configure Microsoft Report Viewer for the Microsoft Dynamics NAV Web Client and SharePoint Client.
ShowPageSearch Specifies whether to show the Search for Page or Report action in the navigation pane of the Role Center window and on the General tab in a page's ribbon. The Search for Page or Report action lets users find Microsoft Dynamics NAV objects, such as pages, reports, and codeunits.
Description: http://partnersource.ru/nav2013_devitpro.en/local/note.gifNote
The Search for Page or Report action only finds objects that are available from the Departments page in the Microsoft Dynamics NAV Windows client.
If you do not want to the Search for Page or Report action available in the Microsoft Dynamics NAV Web client, then set the parameter to false.
Default: true
UnknownSpnHint Specifies whether to use server principal name when establishing the connection between the Microsoft Dynamics NAV Web client server and Microsoft Dynamics NAV Server. This setting is used to authenticate the Microsoft Dynamics NAV Server, and it prevents the Microsoft Dynamics NAV Web client server from restarting when it connects to Microsoft Dynamics NAV Server for the first time. You set values that are based on the value of the ServicePrincipalNameRequired key.
Value: The value has the following format.
(net.tcp://NavServer:Port/ServerInstance/Service)=NoSpn|SPN
  • NavServer is the name of the computer that is running the Microsoft Dynamics NAV Server.
  • Port is the port number on which the Microsoft Dynamics NAV Server is running.
  • ServerInstance is the name of the Microsoft Dynamics NAV Server instance.
  • NoSpn|SPN specifies whether to use an SPN. If the ServicePrincipalNameRequired key is set to false, then set this value to NoSpn. If the ServicePrincipalNameRequired key is set to true, then set this value to Spn.
Default value: (net.tcp://localhost:7046/DynamicsNAV70/Service)=NoSpn
If you set this key to the incorrect value, then during startup, the Microsoft Dynamics NAV Web client will automatically determine a correct value. This will cause the Microsoft Dynamics NAV Web client to restart.
Description: http://partnersource.ru/nav2013_devitpro.en/local/note.gifNote
For most installations, you do not have to change this value. Unlike the Microsoft Dynamics NAV Windows client, this setting is not updated automatically. If you want to change the default value, then you must change it manually.
DnsIdentity This parameter is only relevant when the ClientServicesCredentialType is set to UserName, NavUserPassword, or AccessControlService, which requires that security certificates are used on the Microsoft Dynamics NAV Web client and Microsoft Dynamics NAV Server to protect communication.
Specifies the subject name or common name of the service certificate for Microsoft Dynamics NAV Server.
Description: http://partnersource.ru/nav2013_devitpro.en/local/note.gifNote
You can find the subject name by opening the certificate in the Certificates snap-in for Microsoft Management Console (MMC) on the computer that is running Microsoft Dynamics NAV Web client or Microsoft Dynamics NAV Server.
For more information, see How to: Configure User Authentication for the Microsoft Dynamics NAV Web Client.
Value: The subject name of the certificate
Default value: none
ACSUri This parameter is only relevant if the ClientServicesCredentialType parameter is set to AccessControlService.
Specifies the URI of access control service to use to authenticate users who try to open the Microsoft Dynamics NAV Web client.
Default value: none


See Also


How to: Install the Web Server Components for the Microsoft Dynamics NAV Web Client

To deploy the Microsoft Dynamics NAV Web client, you install the Microsoft Dynamics NAV Web Server components on a computer that is running Internet Information Services (IIS). To access the Microsoft Dynamics NAV Web client, you must have a web browser and a network connection to a Microsoft Dynamics NAV Server instance that connects to a Microsoft Dynamics NAV database. The following illustration shows the components involved in the setup.

Install NAV Web client on same computer as server 

You can install Microsoft Dynamics NAV Web Server components on the same computer as the Microsoft Dynamics NAV Server or on a separate computer.

Note
You do not need a Microsoft Dynamics NAV Server instance or SQL Server database to install the Microsoft Dynamics NAV Web Server components. You can install these components separately and then later configure the Microsoft Dynamics NAV Web Server components to use them.
  
Prerequisites
  • Microsoft Dynamics NAV 2013 installation media. For example, this could be a DVD or network drive that contains the Microsoft Dynamics NAV 2013 installation files.

  • Verify that the system requirements are met on the computer that you want to install Microsoft Dynamics NAV Web Server components. For more information, see System Requirements for Microsoft Dynamics NAV 2013.

  • Install Internet Information Services 7.0 at a minimum.
    Make sure that the required features are enabled. For more information, see How to: Install and Configure Internet Information Services for Microsoft Dynamics NAV Web Client
    Instead of installing and configuring IIS manually, you can use Microsoft Dynamics NAV Setup to install IIS and enable the required features. If IIS is already installed, then Setup will enable any required features that are not currently enabled.

Installing the Microsoft Dynamics NAV Web Server

To install the Microsoft Dynamics NAV Web client, you run Microsoft Dynamics NAV Setup on a computer that is running IIS, and then choose the Microsoft Dynamics NAV Web Server components option. 

To install Microsoft Dynamics NAV Web Server components using the Microsoft Dynamics NAV Setup wizard
  1. On the computer that is running IIS, open the Microsoft Dynamics NAV 2013 installation media.
  2. Double-click the setup.exe file to start the Microsoft Dynamics NAV Setup wizard.
    If you have already installed one or more Microsoft Dynamics NAV components on the computer, you will see the Maintenance page instead of the Welcome page. In this case, choose Add or remove components, and then go to step 7.
  3. Choose the Next button.
  4. To accept the license terms, choose I accept.
  5. On the Microsoft Dynamics NAV Setup page, choose Choose an installation option.
  6. On the Choose an Installation Option page, choose Custom.
  7. On the Customize the Installation page, choose the box next to NAV Web Server Components, and then choose Run from My Computer.
  8. Choose Next to go to the Specify Parameters page.
  9. In the Server section, set the following parameters to configure the Microsoft Dynamics NAV Server instance.


    Parameter
    Description
    Server Name
    Specifies the name of the computer that is running Microsoft Dynamics NAV Server for this client.
    Client Services Port
    The listening TCP port for the computer that is running Microsoft Dynamics NAV Server.
    Service Name
    The name of the Microsoft Dynamics NAV Server instance to connect to.


    Note
    If you currently do not know the Microsoft Dynamics NAV Server instance or you want set up the Microsoft Dynamics NAV Server later, then use the default values.
  10. In the Web Server Components section, set the Port parameter to the TCP port to use for the Microsoft Dynamics NAV Web client website.

  11. If you want to add an item on the Start menu for opening the Microsoft Dynamics NAV Web client, set the Add link to Start menu parameter to Yes.

  12. Set the Install IIS prerequisites parameter to one of the following values.


    Value
    Description
    Install
    Setup enables IIS and the required features for the Microsoft Dynamics NAV Web client and installs the Microsoft Dynamics NAV Web Server components. If IIS is already enabled on the computer, then Setup enables any required features that are not currently enabled.
    Detect
    Setup detects whether IIS and the required features for the Microsoft Dynamics NAV Web client are enabled on the computer, and then does the following:
    o    If the required IIS features are enabled, then Setup installs the Microsoft Dynamics NAV Web Server components.
    o    If any IIS features are not enabled, then Setup does not install the Microsoft Dynamics NAV Web Server components and an error report is generated that lists the required features. You must enable the required features, and then run Setup again to install the Microsoft Dynamics NAV Web Server components.
    Skip
    Setup installs the Microsoft Dynamics NAV Web Server components without detecting whether IIS or the required features are enabled. Setup does not change the IIS setup.


  13. Verify the parameters, and then choose Apply to complete the installation.
  14. When Setup is completed, choose the Close button.
A website called Microsoft Dynamics NAV 2013 Web Client is added on the IIS. You can verify this using the Internet Information Services (IIS) Manager, if you have it installed. The Microsoft Dynamics NAV Web Server components are installed in the \Program Files\Microsoft Dynamics NAV\70\Web Client folder of the computer.

To open the Microsoft Dynamics NAV Web client

  1. To open the Microsoft Dynamics NAV Web client from the computer on which you installed the Microsoft Dynamics NAV Web Server components, do one of the following:
    • On the Start menu, choose All Programs, and then choose Microsoft Dynamics NAV 2013 Web Client.
    • Open a web browser, and then in the address box, type http://localhost:port. Replace port with the TCP port number that you chose during Setup.
    For more information, see How to: Open the Microsoft Dynamics NAV Web Client. If you get an error when trying to open the Microsoft Dynamics NAV Web client, see Troubleshooting the Microsoft Dynamics NAV Web Client Installation for information about resolving the problem.

Next Steps

  1. If Microsoft Dynamics NAV Web Server components was installed on Windows 7, create an inbound rule in the Windows Firewall to allow communication on the TCP port that you chose during Setup.
    For more information, see How to: Create an Inbound Rule in Windows Firewall for the Port of Microsoft Dynamics NAV Web Client.
  2. If the Microsoft Dynamics NAV Web client is installed on a different computer than Microsoft Dynamics NAV Server, set up delegation on Microsoft Dynamics NAV Server from the Microsoft Dynamics NAV Web client.
    For more information, see How to: Configure Delegation for Microsoft Dynamics NAV Web Client.
  3. If you want to change the Microsoft Dynamics NAV Server instance that the Microsoft Dynamics NAV Web client connects to, then modify the web.config file for the Microsoft Dynamics NAV Web client website.
    For more information, see How to: Change the Microsoft Dynamics NAV Server for the Microsoft NAV Web Client.
  4. If you want to help secure the communication with the Microsoft Dynamics NAV Web client, configure SSL.
    For more information, see How to: Configure SSL to Secure the Connection to Microsoft Dynamics NAV Web Client.

See Also

Concepts

Deploying the Microsoft Dynamics NAV Web Client
Troubleshooting the Microsoft Dynamics NAV Web Client Installation


Regards,
Sathish

SSRS calculate percentage of column based on row total

For Row:

To get a Percentage of on row based on total of the particular column.

For e.g: Below is an image i pasted hoping I could explain my issue a lot clearer.


 in col5 right click and write the expression like this

=FORMAT((Fields!Col4.value)/SUM(Fields!Col4.value,"YourGroupName"),"p")

so that will be 10/150=0.66 and multiply by 100

so 0.66 * 100 =6.7%.

I am putting some screenshot for your help.


For Column:


Looking to add a column in my SSRS which will give me the percentage from the total column in that row.

I'm using the following expression, but keep getting 100% for my percentages (I'm assuming this is because the total is evaluated last, so it's just doing Total/Total?

=FORMAT((Fields!ID.Value/SUM(Fields!ID.Value,"Group Name")), "P")
 
enter image description here 

I hope this post will help you and all the best.


Regards,
Sathish

Tuesday 20 May 2014

Report designing in NAV 2013/2013 R2 – Beginner

Before we get into design of reports in Microsoft Dynamics NAV 2013 and Microsoft Dynamics NAV 2013 R2, its important to understand what’s required.

Apart from access to NAV development environment and developer’s license, the following are required:

>>To Design reports in Microsoft Dynamics NAV 2013 we require Microsoft Visual Studio 2010 SP1 Professional, Premium, or Ultimate.

>>To Design reports in Microsoft Dynamics NAV 2013 R2 we need to use:
  • Microsoft Visual Studio 2012/2013 Professional, Premium, or Ultimate edition (Microsoft Visual Studio 2013 is only supported if Microsoft Dynamics NAV is updated according to Knowledge Base article 2907585.)
OR
  • Microsoft SQL Server Report Builder for Microsoft SQL Server 2012/2012 Sp1 or Microsoft SQL Server 2008 R2 Report Builder 3.0 (Microsoft Dynamics NAV 2013 R2 Setup installs Microsoft SQL Server Report Builder for Microsoft SQL Server 2012 if it is not already installed on the target computer.)


In NAV 2013 R2, you can choose to design or modify the report layout using Visual studio or SQL Server Report Builder. You can switch between these 2 designers by going to development environment–> Tools–> Options–>Use Report Builder(yes or No)

please note : The Visual Studio Report Designer provides design functionality that SQL Server Report Builder does not support. For example, in Report Builder, you do not have a document outline view. Also, fields that you add to the table in the development environment are not added automatically to the report dataset in Report Builder.

Report Builder functionality that requires access to a SQL Server Reporting Services server is not supported. This includes running the report from Report Builder, and adding Report Parts.

I have reffered to multiple videos from Microsoft’s channel on YouTube in this post. It showcases how we can build reports in NAV using Visual studio from scratch.

Simple List Report in Microsoft Dynamics NAV 2013:

The first video in this section shows how easy it is to build a simple Customers list report in Microsoft Dynamics NAV 2013 with page header, page footer, image etc.. from scratch. This is a great video for the beginners. The output of the report is shown in the below image:


Customers List Report
                                                     Customers List Report

This video explains How to: Build a simple list report in Microsoft Dynamics NAV 2013 using Visual studio 2010. You can try this report in NAV 2013 R2 with Visual studio 2012/2013 as well:

http://www.youtube.com/watch?feature=player_embedded&v=UYk2Uf9Lqwo


Grouping Data in reports: The next video shows how the above report (customers list) can be grouped country wise. It also shows how you can group data and add sub totals in reports. The output of the grouped report is shown in the below image:

Customers list grouped on Country
                                          Customers list grouped on Country

How Do I: Group data in Microsoft Dynamics NAV 2013 Reports (You can try this report in NAV 2013 R2 with Visual studio 2012/2013 as well):

http://www.youtube.com/watch?feature=player_embedded&v=h0Wg18Nk1c0


Additional video on Grouping data in Microsoft Dynamics NAV 2013 R2.

View Report Dataset

One can view all the data being fetched from Dynamics NAV for a report. This can be seen using the “About this report” feature.

How Do I: View My Report Dataset in Microsoft Dynamics NAV 2013 R2:
Similar to above videos, there are many more useful NAV reporting videos available on YouTube channel and MSDN. I’ve listed most of them below:

List of all How Do I videos on Dynamics NAV are available here .

Regards,
Sathish